Tuesday, February 21, 2017

Plastic Failure Analysis: Automobile Part


Read Consulting was asked to perform plastic failure analysis on a broken pickup truck tailgate latch. Attached are a series of photographs demonstrating the latch and the cause of failure. The latch is mostly held to the back gate with two machine screws that are screwed into PEM inserts pushed into bosses when the plastic is still hot. Over time the flexing of the steel PEM insert in the plastic boss generated fatigue cracks at the sharp edge of the bottom of the insert. This is a typical plastic failure created by the stiffer steel insert applying forces to the weaker plastic receptacle. Often the result of such an interaction is plastic fatigue.. 

Labels: ,

Tuesday, June 21, 2016

Glass Expert Performs a Failure Analysis on a Broken Wine Bottle


Read Consulting glass experts performed a failure analysis on a broken wine bottle. The failure analysis determined that the side of the cork screw had exited the cork and created glass damage that initiated a failure when the cork was being removed. The side of the cork screw crushed the interior wall of the bottle neck. 

PVC Plastic Pipe Failure Analysis


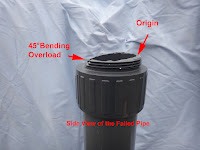
 Read Consulting a California failure analysis lab often performs plastic failure analysis. The failure analysis laboratory was asked to look a a broken 3" diameter PVC pipe. In this case, the plastic plumbing broke due to bending overload. At the origin the failure started as overload the white portion at the origin (see the 10 X micro graph). Under load the crack grew to a length that then turned into brittle failure.


Labels:

Sunday, March 13, 2016

Glass Failure Analysis, Coffee Pot Failure


 Read Consulting failure analysis laboratory was asked to examine a failed coffee pot that had been abraded with a cleaning pad and then subjected to a series of thermal shock cycles. The pot was heated to 190°C then immediately immersed in 10°C water. The pot appeared to survive till the 51st cycle. On this cycle a crack across the bottom appeared. Glass failure analysis performed on the fracture surfaces revealed a glass fatigue failure. The failure initiated at the location of abrasive damage and the flaw grew incrementally after each quench. It is unique to find actual fatigue in a brittle material. Apparently, the thermal shock stress was short term enough to allow incremental growth. Once the crack started, each quench caused the crack to advance and stop. The result is a crack arrest line.

Labels: , , ,

Monday, January 11, 2016

Chair Failure Analysis, Plastic Lawn Chair


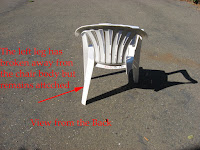
A failed plastic chair was submitted to our failure analysis laboratory for examination. The right rear leg had broken off; however, the initial chair failure occurred on the left rear side. The left rear leg separated from the chair body due to poor bonding and molding porosity at the top of the leg. The failure resulted from manufacturing defects. On the upper right are photographs of the initial failure. There is porosity in the region where the leg is attached to the chair. In addition, the bond line is very narrow. Upper left is a photograph of the same region on an exemplar chair. One can see that the where the leg meets the chair there is severe undercutting. this creates a "stress riser" that reduces the joint strength.

Labels: ,

Saturday, January 31, 2015

Failure Analysis of Restaurant Glass Coffee Mug


Failure analysis laboratory performed a root cause failure analysis on a restaurant glass coffee mug that failed unexpectedly when it was lifted off the table and injured a server. The bottom of the mug separated from the rest of the mug . The origin of the failure was on the interior of the mug at the bottom. It appears as if a hard object had hit the mug interior at the bottom. This can happen when silverware is put in the mug when a table is being cleared. This mug will see severe thermal cycling during its lifetime, and over time, this could have caused the impact damage to grow into a large crack that would cause this type of failure.  

Labels: ,

Sunday, November 09, 2014

Glass Expert performs a Failure Analysis of a Wine Glass


 California glass expert performed a failure analysis on a failed wine glass. Glass failure analysis requires locating the fracture origin. The origin is then analyzed microscopically to determine the cause of failure. In this case the failure origin was on the rim of the glass. At the failure origin is a very small mirror fracture surrounded by mist hackle. This demonstrates that the glass was impacted on the inner rim and propagated from that point to failure. The failure analysis labs at Read Consulting have the capability to analyze all sorts of glass failures.

Labels: , , ,

Sunday, August 03, 2014

Assessing Already Broken Tempered Glass


Glass Expert at Read Consulting is asked to assess whether a broken window or shower door was fully tempered. One method is to select the ten largest "crack free" pieces and determine if these can fit into a 10 square inch area. In the photo above, a 3" X 3" (approximately 10 square inches) "frame" is placed over the broken glass. In this example there are many more than 10 pieces in the opening. Before breaking this glass door, the temper stress was measured to be 16,000 psi using a Strainoptics grazing angle surface profilometer  (GASP). However, it is important to note that there are cases where the fully tempered glass will not fragment properly. The larger pieces result from the stresses applied to break the tempered glass door or tempered glass window.  

Labels: , , ,

Thursday, July 17, 2014


A Read Consulting glass expert witness performed a glass failure analysis of a glass crack driven by thermal stresses. The failed bowl cracked in a microwave oven. Often failures with known causes can be analyzed to lend insight as to the cause of  an "unknown" glass fracture. This fracture has many of the aspects of an impact failure. However, the crack never reaches terminal velocity (i.e. there is no mist hackle generated). This glass failure initiated at a damage site on the bottom, bearing surface of the bowl. The bearing surface is the surface that would be in contact with a flat surface when the bowl was set down.  On the left is an upside down photograph of the bowl. The location of the origin is indicated. On the right is a photograph of the fracture origin on the fracture surface. This glass failure started where there was previous mechanical damage to the bottom of the bowl. The thermal stresses due to the microwave heating were high enough to cause failure as a result of the pre-existing damage. Absence of mist hackle is a key factor in this failure.

Labels: ,

Sunday, March 02, 2014

Glass Bottle Failure Analysis

Larger Point Impact (1/8" Dia.)
Fracture Surface at Origin
of 1/8" at 40X
Small Point Impact (1/32" Dia.)
Fracture Surface at Origin
of 1/32" at 40X
Often bottles and other glass objects fail as a result of "point impact". Given here are two examples of point impact failure origins discovered as a result of glass failure analysis performed at the Read Consulting Failure Analysis Lab. The origin is found by tracing the crack backwards on the fracture surface. Often there is a crushed glass region at the point of impact. This blog demonstrates two impact failures. Shown are the are both the impact point on the free surface and the origin as observed on the fracture surface as viewed at 40X using an optical microscope.  

Labels: , ,

Monday, February 17, 2014

Glass Cookware Failure Analysis: Pyrex Pie Plate Failure

Fracture Surface at One Failure Origin
Assembled Pie Plate Showing Several Failure Origins
Read Consulting Failure analysis lab performed a glass failure analysis. An annealed borosilicate glass Pyrex baking dish failed as a result “thermal shock”. There were multiple origins for the failure, and these all initiated at damage sites on the bottom of the Pyrex baking dish. Because the bottom of the pie plate was convex, setting the dish down and moving it on hard (abrasive) surfaces such as tile counter tops created a “rim” of damage. When the hot dish was placed on a cold surface,thermal shock created tensile stress  on the bottom of the dish, and this caused the failure to initiate at the several preexisting damage sites. This baking dish is appears old and shows signs of heavy use. 


"Scuff" Damage on the Pie Plate Bottom

Labels: , ,

Monday, February 10, 2014

Window Defect Analysis Capabilities

Reflected Zebra Board Image that Shows
Window Roller Distortion Created
During The Thermal Temper Process
Window Scratches Caused by Poor
Cleaning Procedures

The window experts at Read Consulting are often asked to evaluate windows for defects. Many of these are Low-E windows that are also tempered. Two typical defects found are scratches and roller distortion.
Often the scratches are created during post construction cleaning. Roller distortion is formed when the float glass windows are thermally tempered.
Window Scratching: This is evaluated per ASTM C 1036 and is graded by the visibility of the scratches under controlled light conditions. Typical cleaning scratches are demonstrated in the above photo.

Window Roller Distortion (Tempered Glass Roller Distortion): This is evaluated per ASTM C 1048. Distortion in reflection using s standard "zebra board" (i.e. a standard striped pattern).  The photo above shows a sample of roller distortion found on a coated window. This test was done by reflecting the zebra board off the window outer surface. This test was performed on both window exterior surfaces. Often the amount of distortion allowed is defined by the construction contract. 

Labels: , , , , ,

Sunday, February 02, 2014

Plastic Failure Analysis: Fusion Welded HDPE

Poor Welding of a Carrier
Pipe Joint There was no
 Melting on a part of the joint
Read Consulting, a California failure analysis lab, has performed numerous plastic failure analysis on various types of plastic pipe. This includes PVC, CPVC, Delrin and Polypropylene. In this case a plastic failure analysis was performed on a failed containment waste transition line made with fusion welded high density polyethylene pipe. The line was several miles long. The interior transmission pipe had an OD of 8 3/8" and a 1/2" wall thickness.  The containment pipe had  12 3/8" OD with a wall thickness of 1". There were numerous leaks in the line,  and all were found to result from poor fusion welding procedures. The upper right photograph shows a weld on the interior carrier pipe that leaked. In this case the ends of the pipe had not been properly welded before the pipes were fused. This resulted because the pipe end never contacted the heater plate. Obviously, the fusion weld procedures were not properly followed.  It is important to follow exactly the manufacturer's recommended procedures when fusion welding high density polyethylene pipe. In addition, all joints should be leak checked before being buried in the ground. Poor fusion welding creates leaks that are hard to find and are very expensive to remedy. 

Labels: , , , ,

Wednesday, January 15, 2014

Storage Tank Failures, Tank Failure Analysis

 Storage tanks have a finite lifetime, and they should be carefully inspected annually. Read Consulting has performed numerous storage tank failure analysis. Steel tank failures were caused by corrosion. PVC tanks failures were caused by UV degradation of the polymer. Attached are two representative photos of tank failures analyzed in the past. One failure was a 40,000 gallon water storage tank on the California coast. In this case, the bolts on the bottom of the tank corroded away and allowed failure from the pressure at the bottom of the tank. The photograph on the right is a photo of a pressure switch on a male pipe nipple that was screwed into PVC female threads. This is a photo after the repair. The original assembly failed under pressure as a result of UV degradation of the PVC. The cantilevered switch applied enough force to cause the pipe to crack and fail. This PVC failure occurred as a result of UV degradation and poor assembly design. Read consulting has also been involved with tank failure analysis of  stored chemical storage tanks and fertilizer storage tanks.

Labels: , , , , ,

Saturday, December 14, 2013

Failure Analysis Lab Analyzes Shower Door Failure

Installed Shower Door

Top Roller  at Stop
Disassembled Roller

Fracture Surface at Origin
Tempered glass shower doors have been modernized. Recent designs have the doors suspended by rollers that ride on a pipe. In certain cases the door stop is on the top. In this case, the roller is stopped by a rubber bumper. Several of these doors had failed during use, and the glass experts at Read Consulting were asked to perform a failure analysis and suggest solutions to the glass fracture problem.

The two top photographs illustrate how these types of doors are installed. Basically they are hung on two rollers that are bolted to the tempered glass doors using holes cut into the glass. At the end of travel, these doors are stopped when one roller hits a rubber bumper. There is some cushion from the rubber bumper; however, this is not enough.

Glass failure analysis was performed on a representative failed door. In this case, the failure origin was clamped in one of the two rollers. The failure initiated on the interior wall of one of the through holes in the glass. It is believed that the failure forces are created by torsional moments generated because the top of the door is stopped, but the bottom of the door is not. When the door is stopped at the top, the unrestrained bottom creates a large rotation moment. This moment puts high forces on the walls holes in the glass. These forces act on the ground hole walls to cause failure.

The two lower photographs document the glass failure analysis. It is believed that the stopping mechanism must not generate twisting moments. One solution is to put the rubber stopper in the center of the door, not at the top. Another solution is to slowly reduce the door speed (i.e. create drag) before it hits the stop at the top.

Labels: , , , ,

Sunday, December 08, 2013

Failure Analysis Lab performs Electronic Failure Analysis

Array of Pogo Pins
Top of Pogo Pin at Mag. 30 X
Cross sectioned Pogo Pins at Mag. 5 X
Read Consulting Failure Analysis Labs often perform electronic failure analysis for various manufacturers. The objective is to determine the root cause of the failure and help the manufacturer correct the problem.In this case, a company that assembles an array of Pogo connector pins into an instrument for multiple contacts. Some of the Pogo pin arrays are hand soldered into the equipment; other arrays are assembled using a wave solder machine. The wave soldered arrays had poor contact. Initially we were told that there were two shipment lots of Pogo pin arrays, and it was thought that  one was bad. Read Consulting tested a representative sample from both lots and could find no difference:
1. Through the optical microscope the pins from both lots were found to have good gold plating. On the upper left is a  photomicrograph of the surface of a "bad" pin.
2. In both cases testing the Pogo pins with a needle showed good contact all through the instrument.
3. Samples were cross sectioned and both lots showed good plating on the interior of the Pogo pins. Center photomicrograph.

The client was advised that there was no bad lot. It was suggested that the Pogo pins be wiped with isopropyl alcohol and retested. This test was successful; therefore one must conclude that a contaminant film settled on the contact surfaces during the wave solder operation. The alcohol wipe was added to the procedure.

Labels: , , ,

Sunday, December 01, 2013

Tempered Glass Expert Discusses Tempered Glass Fracture Surfaces

Fracture Surface of Thermally
Tempered Glass
Fracture Surface of Chemically
 Tempered Glass
The Glass Expert Witness at Read Consulting have performed hundreds of glass failure analysis on tempered glass pieces. These include both thermally tempered and chemically tempered glass.


Thermally tempered glass has compressive stress on its surfaces. The thickness pf the compressive layer is a function of the over all glass thickness; this thickness is 20% of  the glass thickness. In addition, the resulting fracture surface of thermally tempered glass has distinct characteristics. There are two sets of Wallner lines (which indicate the crack travel direction) separated by a band of mist hackle. In addition, near the surfaces there are parallel markings indicating the surface compressive stresses.

Chemically tempered glass also has its surfaces in compression. For this glass, the compressive layer is very tin; it is on the order of 10µ's. In addition, this thickness is not a function of the glass thickness. It is dictated by the chemical tempering  process. Because the compressive layer is so thin, there are no distinct markings on the fracture surface. Often the fracture surface is featureless, or it will have a single set of Wallner lines indicating the direction of travel.

Labels: , , , , ,